The 10 Best Powershot Camera Offers in UK - July 2026


- A powerful pocket-sized camera with a bright lens, large sensor and DIGIC 7 to capture expert quality photos and movies with ease. Focal length - 4.2x zoom: 8.8 (W) - 36.8 (T) mm, 35mm film equivalent: 24 (W) - 100 (T) mm). Focusing range: 5cm (2.0 inch) - infinity (W), 40cm (1.3feet) - infinity (T). Macro: 5 - 50cm (W) (2.0 inch - 1.6 feet (W))
- Shoot and share stunning Full HD 60p movies with creative control, Touch AF for cinematic focus pulls and 5-axis Dynamic IS. 3 inch type touchscreen and tilt-type LCD monitor 180 degree upwards, 45 downwards
- Easily connect to your smart device, shoot remotely, then share or back up your creations using Wi-Fi* with NFC and Image sync
- Enjoy simple creative control with a Lens Control Ring, intuitive touchscreen operation, 14-bit RAW and Picture Styles

- ❤【Compatibility】this silicone case is customly designed for Canon powershot SX740 HS camera and SX730 HS camera, so it can perfectly fit for SX740 hs camera and SX730 hs camera to provide effective protection.
- ❤【Soft Material】 the sx740 hs case is made of soft and tough silicone material, soft and comfortable touch, lightweight, washable, extremely durable, not add any burden for your sx740 hs or sx730 HS camera. (Please Note: Don't place the silicone cover in direct sunlight or high temperature environment to avoid deformation.)
- ❤【Enhanced Grip】 this sx740 hs sx730 hs case silicone comes with the hand grip design, adding the grip to camera, easy to carry, prevent the camera from dropping effectively, which can provide the better protection for canon SX740 hs or SX730 hs camera.
- ❤【Precise Cutout】: the SX740 SX730 hs silicone case with the precise cutout, the bottom opening design can change the battery or SD card directly, the screen can be flipped freely. And the case for sx740 sx740 hs camera comes with a cute removable lens cover to protect the camera lens effectively.
- ❤【Convenient Use】: the case for canon sx730 sx740 hs camera can be installed and removed easily, with this silicone case on, not affect to use of functional key on the camera, can shoot and use normally. Various vivid colors can also be a decoration to the camera, just like a glove to the camera, will be a great gift for birthday, thanks-giving day, Christmas etc.

- Powerful 40x Optical Zoom with Optical Image Stabilizer and Zoom Framing Assist
- 4K Video and 4K Time-lapse Movie. Focusing Range- Auto- 0.4 in. (1cm) - infinity (W), 6.6 ft. (2.0m) - infinity (T).Normal- 2.0 in. (5cm) - infinity (W), 6.6 ft. (2.0m) - infinity (T).Macro- 0.4 in. - 1.6 ft. (1-50cm) (W)
- Built-in Wi-Fi* and Bluetooth** Technology
- 20.3 Megapixel*** CMOS Sensor
- DIGIC 8 Image Processor / 3.0-inch Tilt-type (180° up) LCD / High-speed Continuous Shooting at up to 7.4 fps (up to 10.0 fps with AF Lock) / Feature Assistant

- HIGH RESOLUTION: The Kodak Pixpro FZ45 camera features a 16 megapixel sensor, which offers high resolution for sharp, detailed images.
- HIGH-PERFORMANCE LENSES: The camera lens features a 4x optical zoom, allowing you to precisely capture distant subjects.
- HD VIDEO RECORDING: The camera can record high-resolution videos up to 720p, for clear and smooth memories.
- Tilting LCD Screen: The camera's 2.7-inch LCD screen can be tilted for easier framing, even from difficult angles.
- OPTICAL STABILIZATION MODE: The Kodak Pixpro FZ45 camera features an optical stabilization mode that helps create sharp, precise images.

- 40x optical zoom in pocket size - great for on the go
- Capture memories in 4K Ultra High Definition
- Excellent photo capture with 20.3 megapixels
- Save and share recordings with Wi-Fi and auto transfer
- Box contents: PowerShot SX740 HS Lite (black); wrist strap WS-800; NB-13L lithium-ion battery; CB-2LHE battery charger; power cord, instructions
- COMPACT DIGITAL CAMERA: PowerShot SX740 HS Lite boasts a powerful 40x optical zoom & a 20.3 Megapixel CMOS sensor, plus DIGIC 8 for capturing high definition photos with ease
- PHOTOGRAPHY: Our unique DIGIC 8 processor actively manages camera settings such as Zoom Framing Assist & Hybrid Auto - simply point & shoot with incredible results
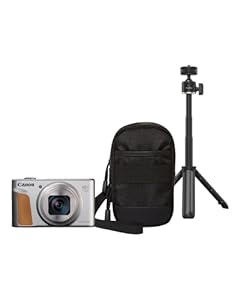
- TRAVEL KIT: With SmallRig tripod & travel case - measuring just 39.9mm deep, this slender action camera fits easily in your bag - perfect for capturing holiday & travel memories
- PORTRAIT: Use the LCD screen to snap the perfect selfie with Self Portrait mode - fill your photo album or scrapbook with special memories
- CONNECTIVITY: Advanced Bluetooth, Wi-Fi connectivity & Auto Transfer allows you to easily share & back-up photos to compatible smart devices or home computer

- High Speed 64GB UHS-1 SDXC Memory Card Class 10
- Made using the highest quality full capacity memory chips
- Lifetime Warranty
- Ideal high speed SD memory card for Canon Powershot SX740 HS, Canon Powershot SX70 HS and Canon EOS R Digital Cameras and SLR cameras
- Digi-Chip Speed Pro High Speed Series - Up to 80mb/s UHS-1 Speeds

- High-Quality USB Camera Cable: The pluX USB-A to Mini USB cable is designed for quick and reliable charging and data transfer. Measuring 1 metre in length, it features 1A Fast Charging capability for your camera or camcorder
- High-Speed Data Transfer: Safely and efficiently transfer photos and videos to your computer at speeds of up to 480 Mbps with USB 2.0 technology. Supports firmware and software updates, providing a dependable camera-to-laptop connection
- Durable & Long-Lasting: Crafted from tough, tangle-free PVC material, this cable is built to withstand everyday use. The sturdy PVC USB connectors ensure long-term reliability, making it perfect as a replacement or spare lead
- Peace of Mind: Backed by pluX’s commitment to quality, this USB camera cable is manufactured to high standards and rigorously tested for safety
- Extensive Compatibility: Works with a wide range of Canon models, including EOS 350D, EOS 70D, PowerShot G7 X, EOS 5D, EOS 80D, EOS 750D, EOS 40D, EOS 5D Mark II, EOS 600D, EOS 550D, EOS 7D, EOS 700D, PowerShot A430, EOS 60D, PowerShot SX50 HS, EOS 300D, PowerShot SX430 IS, EOS 4000D, PowerShot G1X, EOS 1100D, EOS 1000D, PowerShot G3 X, PowerShot S90, EOS 500D, EOS 450D, PowerShot SX40 HS, EOS 400D, PowerShot SX540, IXUS 185, EOS M100, PowerShot SX500 IS, PowerShot G7, PowerShot G12, EOS 650D, PowerShot SX30 IS, PowerShot SX60 HS, PowerShot SX430 HS, EOS 100D, EOS 50D, EOS 30D, EOS 760D

- Case Only! (camera and accessories not included) This camera silicone cover is compatible with Canon PowerShot SX740 Digital Camera, Canon PowerShot SX730 digital camera, it’s stylish and easy to use, perfect to keep your Canon sx740 hs camera safe.
- This Silicone camera Case for Canon PowerShot SX740 digital camera is made of upgrade durable silicone material, dustproof, scratchproof, shockproof and non-slip. Add an extra layer for your canon sx740 hs camera, protect your sx740 camera from drops and bumps.
- The canon sx740 hs case is moulded by real camera, perfect to match the powershot sx740 buttons and charging port, soft sx740 hs silicone cover easy to install and uninstall, give you better using feeling and comfort to enjoy the capturing with canon powershot sx740 digital camera.
- This canon sx740 hs cover has a detachable lens cover, you can use your Canon SX730 camera with the lens cover to protect your camera lens, or you can also just use the canon sx 740hs camera without lens cover, the sx740 soft case is super soft and lightweight, protect your sx740 digital camera from scratches and dirt, sx740 rubber case east to grab, you can simply carry it wherever you go and enjoy.
- The canon sx740 case is soft and durable, perfectly match the Canon PowerShot SX740 camera from every corner, provides all round protection for your canon sx740 sx730 camera, prevents bumps and drops, with the canon sx740 hs camera protective silicone cover installed, you can use your camera anywhere with no concern.
Compare Powershot Camera and find the most suitable offer.
The Powershot camera series is a well-known lineup of digital cameras manufactured by Canon, a leading brand in the imaging industry. These cameras are popular among both professional photographers and casual users due to their exceptional image quality, user-friendly interface, and advanced features.
One of the major advantages of Powershot cameras is their high-resolution image sensors. These sensors allow users to capture stunningly detailed photos with vibrant colors and excellent dynamic range. Whether you are shooting landscapes, portraits, or fast-paced action scenes, these cameras deliver impressive image quality in various lighting conditions.
Another standout feature of Powershot cameras is their versatility. Canon offers a wide range of models tailored to meet different user needs and preferences. From compact point-and-shoot cameras that easily fit in a pocket to advanced models with interchangeable lenses, there is a Powershot camera for every skill level and photographic requirement.
The Powershot cameras also come equipped with user-friendly interfaces, making them accessible even for beginners. The intuitive menu layout and well-placed controls allow users to navigate through the camera settings effortlessly, enabling them to concentrate on capturing the perfect shot.
Moreover, many Powershot cameras offer a variety of shooting modes and creative filters. These features allow users to experiment with different styles and bring out their creativity. Whether you want to shoot in automatic mode for quick snapshots or take full manual control over your images, Powershot cameras offer a range of options to suit your preferences.
When it comes to video recording, Powershot cameras perform exceptionally well. They can capture high-quality videos in resolutions up to 4K, allowing users to create professional-looking footage. Many models also offer features such as image stabilization and manual exposure control, giving videographers more flexibility and control over their recordings.
In conclusion, the Powershot camera series by Canon offers a great balance of image quality, versatility, and usability. Whether you are a professional photographer or simply enjoy capturing life's moments, these cameras provide the tools and features you need to express your creativity and produce stunning visuals. With their excellent performance and wide range of options, Powershot cameras continue to be a popular choice among photography enthusiasts worldwide.
** "Free Delivery" means that this is possible under the given conditions at the time of data retrieval from the relevant provider, but cannot be guaranteed. It is technically not possible to provide information in real-time. The shipping costs may vary under certain circumstances (different provider, place of delivery, etc.). The shipping costs shown in the further ordering process apply.
Other IMPORTANT INFORMATION that we ask you to take note of:
We may receive a commission if you make a purchase via the links on our site. This has no impact on the placement of the products on our site. Our website is part of amazon associates program - Amazon, Amazon Prime, the Amazon Logo and Amazon Prime Logo are registered trademarks of Amazon, Inc. or its affiliates.
Disclaimer:
1. The prices shown may have risen since the time we last updated them.
2. The actual price of the product on the seller’s site at the time of purchase will govern the sale.
3. It is not technically possible for the prices displayed above to be updated in real-time.
How do I turn my Powershot camera on?
Turning on a Canon Powershot camera is a simple process that can be done in a matter of seconds. Before you begin, ensure that your camera is fully charged or has fresh batteries to avoid any interruptions during the process.
First, locate the power button on your Canon Powershot camera. This button is usually labeled with an icon that looks like a circle with a line running through it. The location of the power button may vary depending on the camera model, but it is typically found on the top or back of the camera.
Next, press and hold down the power button until the camera turns on. Depending on the model, you may see a Canon logo appear on the screen during the boot-up process. Once the camera has fully powered on, you will be taken to the camera's home screen.
If your camera has a viewfinder, you may need to switch between the viewfinder and the LCD screen to begin taking photos. To do this, locate the button on your camera that switches between the viewfinder and the LCD screen. This button may be labeled with an icon that looks like a rectangle with a diagonal line through it. Press this button to switch between the viewfinder and the LCD screen.
Lastly, ensure that your camera settings are set properly for your intended use. Adjust the settings such as aperture, shutter speed and ISO to your preferences before taking a photo. Additionally, ensure that you have a memory card in your camera to save your photos.
In conclusion, turning on a Canon Powershot camera can be done in a few easy steps. By following the steps outlined above, you can quickly begin taking high-quality photos with your camera. Remember to charge or replace your batteries before use and adjust your camera settings to match your intended subject and environment.
What are the different shooting modes on my Powershot camera?
Canon's Powershot cameras come with different shooting modes that cater to various photographic needs of the users. Whether you want to capture landscapes, portraits, or action shots, your Powershot camera has select shooting modes that help you achieve the desired outcome with ease.
One of the most basic shooting modes on a Powershot camera is the "Auto Mode," where the camera automatically sets the appropriate settings to take photos in different lighting conditions. For example, if you're shooting against bright sunlight, the camera will automatically adjust the aperture and shutter speed, resulting in a well-exposed image.
Another popular shooting mode on Powershot cameras is the "Portrait Mode" that optimizes the camera settings to capture stunning portraits. The mode sets the aperture to a low f-stop number, resulting in a shallow depth-of-field effect that blurs the background and brings the subject into sharp focus. The camera also optimizes the skin tone and sharpness to get beautiful, natural-looking portraits.
For those wanting to capture fast-moving objects, the "Sports Mode" is ideal. The mode adjusts the shutter speed, so you can capture the subject in motion without any blur. It's great for capturing athletes, animals, or any other fast-moving subject.
"Macro Mode" is perfect for capturing small objects and details, such as flowers, insects, or jewelry. Macro mode allows you to get up close with your subject while keeping it in sharp focus, making it a great option for close-up photography.
Lastly, "Manual Mode" gives the user full control over shutter speed, aperture, and ISO, offering significant flexibility for photographers who want to experiment with various settings to achieve artistic effects.
In conclusion, Powershot cameras come equipped with various shooting modes catering to different photographic needs. With features like Auto, Portrait, Sports, and Macro modes, supported by Manual mode for experimentation, you have the flexibility to explore and experiment with various shooting modes and capture stunning photos with ease. Knowing the different shooting modes available on your Powershot camera can significantly improve your photography skills, enhancing your creativity and helping you to capture images that will last a lifetime.
How do I change the ISO settings on my Powershot camera?
Changing the ISO settings on a Powershot camera is a simple process that can greatly affect the quality of your photographs. ISO determines the sensitivity of your camera's sensor to light, and a higher ISO means a brighter but more grainy image. Here's how you can change the ISO settings on your Powershot camera:
1. First, turn on your camera and make sure it's in shooting mode. You can do this by turning the dial on the top of the camera to the camera icon.
2. Locate the ISO button on your camera, which is usually located near the shutter button or on the back of the camera. It will have "ISO" written on it.
3. Press the ISO button and use the arrow buttons on your camera to select the desired ISO setting. Depending on your camera model, you may see a range of ISO options, such as 100-3200.
4. Once you have selected your ISO setting, press the "OK" or "SET" button on your camera to confirm your selection.
5. Take your photograph and review the result. If the image is too bright or dark, you may need to adjust your ISO setting to achieve the desired effect.
6. Remember, a higher ISO will result in a brighter but more noisy image, while a lower ISO will result in a darker but smoother image. Experiment with different ISO settings to find the right balance for your photography needs.
In conclusion, changing the ISO settings on your Powershot camera is a simple process that can greatly impact the quality of your photographs. By adjusting your ISO settings, you can achieve the desired lighting conditions and capture stunning images. Experiment with different ISO settings to find the right balance for your specific photography needs.
How do I transfer photos from my Powershot camera to my computer?
Transferring photos from a Powershot camera to a computer is an easy task that can be done in just a few simple steps. The first step is to ensure that your camera and computer are compatible. If your computer has a USB port, you can easily connect your camera using a USB cable. Most Powershot cameras are bundled with a USB cable in the packaging.
Once you have connected your Powershot camera to your computer, the next step is to navigate to your camera's memory card. In most cases, your camera's memory card will appear as a removable disk on your desktop. If your memory card does not appear, you can navigate to it through the File Explorer. Your camera's memory card will typically be located under the 'This PC' tab.
Next, locate the folder that contains the photos you want to transfer. In most cases, this folder will be named DCIM (Digital Camera Images). Once you have located the folder, you can begin transferring the photos to your computer. You can easily drag and drop the files from your camera's memory card to your computer.
Alternatively, you can use the software that comes bundled with your Powershot camera to transfer your photos. This software is typically installed on your computer when you first connect your camera. In most cases, the software will automatically launch when your camera is connected to your computer. The software typically provides additional features, such as the ability to organize your photos, edit them, and share them on social media.
After you have transferred your photos, it's important to ensure that they are saved in a safe location on your computer. It's recommended that you create a separate folder for your Powershot camera photos so that you can easily locate them in the future. You can also create backups of your photos by uploading them to cloud storage services, such as Google Drive or Dropbox.
In conclusion, transferring photos from a Powershot camera to a computer is a simple process that can be done in a few easy steps. Whether you choose to use a USB cable or software provided by your camera, the process is quick and hassle-free. By following these steps, you can easily transfer your photos to your computer and ensure that they are safe and secure.
How long does the battery last on my Powershot camera?
The battery life of your Powershot camera depends on various factors such as the model of your camera, usage, and environmental conditions. Generally, Canon Powershot cameras come with rechargeable lithium-ion batteries that last for a few hundred shots. However, the battery life of your camera can be extended by following some power-saving tips.
To preserve battery life, you can adjust the LCD screen brightness, turn off Wi-Fi and GPS connectivity when not in use, and use the optical viewfinder instead of the LCD screen. You can also turn off image stabilization and automatic flash to save battery power.
If you are using a high-end Powershot camera, it may have a longer battery life than an entry-level model. For instance, the Powershot G7X Mark II has a battery life of approximately 265 shots, while the Powershot SX730 HS can take up to 250 shots per charge. Canon's PowerShot G1 X Mark III, on the other hand, can last for up to 200 shots, depending on usage.
If you are going on a long trip or have a heavy usage day, it might be a good idea to bring along spare batteries or a portable charger. The Canon NB-13L battery pack is compatible with most Powershot cameras, and it allows you to shoot for extended periods without worrying about running out of battery life.
In addition to battery life, it's also important to keep in mind that battery performance degrades over time. If you have been using your camera for several years, you may notice that the battery life is shorter than when you first got the camera. In such cases, it may be time to replace the battery or consider purchasing a new camera altogether.
In conclusion, the battery life of your Powershot camera varies depending on the usage, model, and environmental factors. By following some power-saving tips, you can extend the battery life and enjoy more shooting time. If you need extended battery life, it's always a good idea to carry a spare battery or a portable charger with you.
Can I shoot in RAW format with my Powershot camera?
Yes, you can shoot in RAW format with your Canon Powershot camera. However, not all models may have this feature, so it's best to check the specifications of your specific camera model to see if it supports RAW shooting.
RAW format is a type of uncompressed image file that contains all the data captured by the camera's sensor. This format allows for greater flexibility when editing your photos as it preserves more detail and provides more room for manipulating color, exposure, and other aspects of the image.
To shoot in RAW format with your Powershot camera, you will need to change the camera's settings to enable RAW capture. This can usually be done through the camera's menu system, and once enabled, the camera will save RAW files alongside JPEG files when you take photos.
It's important to note that RAW files take up more storage space than JPEG files, so you may need to invest in additional memory cards or storage devices if you plan on shooting in RAW format frequently.
If you're new to shooting in RAW format, it may take some time to adjust to the workflow of processing and editing your photos. However, the increased control and quality of the final images can be well worth the extra effort.
In summary, shooting in RAW format with your Canon Powershot camera is possible if your camera model supports it. RAW files provide more flexibility and control when editing your photos, but also take up more storage space. With the right settings and workflow, shooting in RAW format can help you take your photography to the next level.
How do I use the manual focus on my Powershot camera?
Many Canon Powershot cameras include a manual focus mode that gives you complete control over the focus of your images. While autofocus is often the easiest and most convenient way to focus your shots, manual focus can be useful in a variety of situations.
To use the manual focus on your Canon Powershot camera, start by navigating to the settings menu. Depending on your camera model, you may need to press the "Menu" button and navigate to the "AF/MF" or "Focus" option. Once you have selected the manual focus mode, you can adjust the focus using the control dial or the focus ring on your lens.
When using manual focus, it's important to pay close attention to your subject and the surrounding environment. Look for distinct features or patterns that can help you determine the correct focus point. Depending on your camera model, you may be able to zoom in on your subject to fine-tune your focus.
Keep in mind that manual focus can be more challenging in low light conditions or when shooting moving subjects. In these situations, you may need to adjust your aperture, shutter speed, or ISO to achieve the desired effect. Experimenting with different settings can help you find the perfect balance between sharpness and motion blur.
If you're new to manual focus, consider practicing with stationary objects before moving on to more challenging subjects. Start by selecting a small, distinct feature (like a flower or a piece of jewelry) and practice adjusting the focus until it's razor-sharp. Once you feel comfortable with basic manual focus techniques, try experimenting with more advanced techniques, like zone focusing or hyperfocal distance.
In conclusion, using the manual focus on your Canon Powershot camera can give you more control over the focus and help you achieve the perfect shot. Whether you're shooting portraits, landscapes, or still life, manual focus can help you create images that are both beautiful and unique. So don't be afraid to experiment with different settings and techniques - you might be surprised at the stunning results you can achieve!
How do I activate the self-timer on my Powershot camera?
Activating the self-timer on your Powershot camera is easy and convenient. This feature allows you to take pictures without physically pressing the shutter button, which can prevent camera shake and produce sharp images. In this article, we will explain how to activate the self-timer on your Powershot camera.
Step 1: Turn on the camera
Before you can activate the self-timer, you need to turn on your Powershot camera. Press the power button on your camera to turn it on. Wait for a few seconds until the camera initializes and displays the main menu.
Step 2: Select the shooting mode
Navigate to the shooting mode menu on your Powershot camera. You can usually find this menu at the top of the screen or by pressing the mode button. Select the shooting mode that you want to use for your picture.
Step 3: Activate the self-timer
Once you have selected your shooting mode, you can activate the self-timer on your Powershot camera. Look for the self-timer option on the menu screen. This option is usually represented by a clock icon. Press the self-timer option to activate it. You can adjust the self-timer delay time according to your needs.
Step 4: Compose your shot
After activating the self-timer, compose your shot as you normally would. Ensure that your camera is stable, and your subject is in focus. You can use a tripod or any steady surface to stabilize your camera.
Step 5: Press the shutter button
Now that your shot is composed, you can press the shutter button to start the self-timer countdown. Once you press the button, the camera will take a few seconds to stabilize and focus. After the delay time is over, the camera will automatically take the picture.
Step 6: Review your picture
After the picture is taken, you can review it to ensure that it meets your expectations. If you are not happy with the shot, you can delete it and take another picture using the same process.
In conclusion, activating the self-timer on your Powershot camera is a simple process that can produce sharp and stable pictures. By following these steps, you can use the self-timer feature on your camera and enjoy taking pictures without camera shake. Remember to compose your shot correctly, and use a stable surface to prevent camera movement.
What type of memory card is compatible with my Powershot camera?
If you own a Canon Powershot camera, you need a memory card to store your photos and videos. Choosing the right type of memory card can make all the difference in how your camera performs. Your camera's user manual should provide guidelines for compatible memory cards, but you can also find this information online.
The Canon Powershot cameras generally support SD, SDHC, and SDXC memory cards. Depending on your camera's model and release date, it can support different types and capacity of memory cards. Before purchasing a memory card, make sure it matches your camera's specifications to avoid incompatibility errors.
While SD cards have a maximum capacity of 2GB, SDHC (High-Capacity) cards range from 4GB to 32GB. SDXC (Extended-Capacity) cards have capacities between 64GB to 2TB. Keep in mind that some older models may not support SDXC cards, so it is best to check your camera's manual for compatibility.
Besides storage capacity, your camera's speed class is also important. It is best to use memory cards with greater speed classes for faster read and write speeds. This is important when you're capturing videos or taking pictures in rapid succession. Class 10 memory cards have a minimum write speed of 10MB/s and are recommended for most Powershot cameras. When shopping for memory cards, look for Class 10 or UHS-I (Ultra high-speed) labels to ensure optimal performance.
Additionally, your camera's card format can affect its compatibility. Your Powershot camera may use SD cards in different formats, such as MicroSD or MiniSD. In this case, you may need to use an adapter to fit the card into the camera's card slot. Make sure you read your camera's user manual to determine which format to use.
In summary, it is essential to use the correct memory card for your Canon Powershot camera. Ensure that the card is compatible with your camera's specifications, storage capacity, speed class, and format. Following these steps will guarantee a smooth and efficient storage process for your photos and videos, without the worry of card errors or compatibility issues.
How do I adjust the white balance settings on my Powershot camera?
White balance is an important feature on any camera that can significantly improve the quality of your photographs. The white balance setting on your Powershot camera is responsible for adjusting the color temperature of your images, making them appear more natural and true-to-life. In this guide, we'll show you how to adjust the white balance settings on your Powershot camera.
Before we start, it's important to understand what white balance is. Essentially, it's the process of adjusting the colors in your image so that objects that appear white in real life also appear white in the photograph. This is because different sources of light have different color temperatures, which can affect the way your images look. By adjusting the white balance, you can ensure that your images are free from these color casts and look more natural.
To adjust the white balance on your Powershot camera, you'll need to access the shooting menu. This can be done by pressing the menu button on the back of your camera. Once you're in the shooting menu, you'll need to navigate to the white balance setting. This will likely be located in the first or second category of options, depending on your camera model.
Once you've found the white balance setting, you'll have several options to choose from. Most Powershot cameras will offer the following presets: Auto, Daylight, Cloudy, Tungsten, Fluorescent, and Custom. If you're new to white balance, it's best to start with the Auto setting, as this will adjust the color temperature based on the lighting conditions in your environment.
If you find that your images are still coming out with a color cast, you can try one of the other presets. For example, if you're shooting indoors under artificial lighting, you might find that the Tungsten or Fluorescent settings produce better results. Alternatively, if you're shooting outside on a cloudy day, the Cloudy preset might be more appropriate.
If none of the presets are giving you the results you want, you can try adjusting the white balance manually using the Custom setting. This is a more advanced option that requires you to set the color temperature yourself. To do this, you'll need to take a photograph of a white or neutral object (like a white piece of paper) under the same lighting conditions as your subject. Once you've taken the photo, you can set the white balance based on that image.
In conclusion, adjusting the white balance on your Powershot camera is a simple but important step that can greatly improve the quality of your images. By using the presets or tweaking the white balance manually, you can ensure that your photographs look natural and true-to-life. Experiment with the different settings and see which work best for your shooting conditions. Happy photographing!